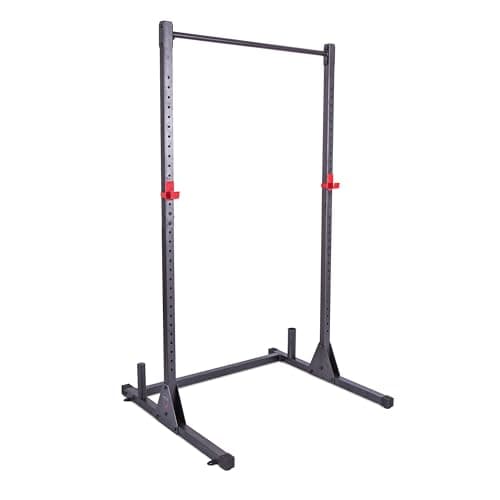
What you get for the money: a complete cage, not a stand
The single reason to look at the CAP rack is that it’s a genuinely complete four-post cage at the price of a stand. Plenty of budget options at this end of the market are half-measures — a squat stand with two uprights, a folding wall rack, or a tower that leans on a wall. The CAP is a proper closed cage: four posts, a pull-up bar across the top, and a pair of safety bars you can set to catch a failed lift. That combination is the whole value story. For a first home gym on a tight budget, it covers squats inside the cage, presses, rack pulls, and pull-ups from the top bar without asking you to buy attachments separately. If you want the wider context on what a cage even does and why the closed four-post design is the safe default, our what is a power rack guide lays out the basics.
It’s worth being precise about what “complete” buys you here. The cage takes the same 2" Olympic platesand bar you already own, the pull-up bar is part of the frame rather than a bolt-on, and the safety bars mean you can train alone with a real catch point under the bar. None of that is remarkable on an expensive rack — it’s expected. What’s notable is getting all of it at the bottom of the market. That’s why the CAP anchors the value end of our best budget power rack thinking: a real, usable cage at a price that undercuts almost everything else with four posts.
The honest catch: thin uprights and a moderate load ceiling
Here’s the honest part. The CAP hits its price by using thinner-gauge uprights than a serious rack, and that has real consequences. Steel thickness is the single biggest driver of how much weight a cage can absorb, how stiff it feels under a heavy bar, and how hard a dumped load it can catch on the safeties. A thin-walled upright flexes more, and the honest way to read that is as a moderate load ceiling: this is a rack for building strength at sensible home-gym numbers, not for a lifter dumping near-maximal loads onto the safeties session after session. If you want to understand exactly why wall thickness matters this much — and what the jump to a heavier cage actually buys — our 11-gauge vs 14-gauge steel guide is the piece to read before you decide.
The important framing is that a moderate ceiling isn’t the same as unsafe — it’s a matter of matching the rack to the lifter. For someone learning the lifts, running a beginner or intermediate program, and progressing at a normal pace, the CAP’s frame is plenty. The trouble starts when a strong lifter treats a budget cage like a commercial one and repeatedly slams heavy weight into thin steel. That’s where the price catches up with you. Read the ceiling as a genuine limit, train inside it, and the thin uprights are a reasonable trade for the money; ignore it and you’ve bought the wrong rack.
Why bolting it down isn’t optional
Because the frame is light, bolting the CAP to the floor is close to mandatory, not a nice-to-have. A heavy commercial cage stays put on its own mass; a budget rack with thin steel and a modest footprint can rock, shift, or tip if you re-rack hard, kip on the pull-up bar, or catch a dumped load off-center. Anchoring solves all of that at once. Lag-bolting the base into a concrete slab turns the floor into part of the structure, kills the wobble, and dramatically raises the effective stability of the whole cage. On a rack like this it’s the single most valuable thing you can do, and it costs very little. Our how to anchor a power rack guide walks through the anchor hardware, the slab requirements, and the step-by-step for doing it properly.
If you can’t anchor into concrete — a wooden floor, a rented space, an upstairs room — that changes the calculus honestly. You can partly compensate by bolting the rack to a large plywood platform that spreads the load and gives it a wider, heavier base, but you should also be more conservative with the weight you put on it and how hard you re-rack. A budget cage that can’t be anchored is best kept to moderate loads and treated with a little more care. If a rock-solid, no-anchor experience is what you’re after, that’s a reason to step up to a heavier rack rather than fight the CAP’s light frame.
J-hooks and bar protection
The other place the price shows is the J-hooks. The CAP ships with basic J-hooks that offer minimal bar protection— typically bare or thinly lined cradles rather than the thick plastic or UHMW liners you get on a nicer rack. The consequence is cosmetic more than structural: metal-on-metal contact will mark the knurl and finish of your bar over time, so every rack and un-rack leaves a little wear where the shaft sits in the hook. It doesn’t weaken the bar and it won’t stop you training, but if you own a bar with a finish you care about, it’s worth knowing the stock hooks aren’t gentle on it.
The good news is this is the easiest weakness to fix. You can line the hooks yourself with adhesive plastic or a strip of hose, or drop in a set of aftermarket J-hooks with proper liners down the line. On a budget rack that’s a sensible order of operations: buy the cheap complete cage, then spend a little on the one contact point that touches your bar. It’s a good example of how the CAP’s corners are cut in places you can upgrade rather than in the frame itself, which you can’t.
The quiet advantage: stock, returns and a huge owner base
One upside that’s easy to overlook: this is a CAP product from a long-standing budget line with an enormous owner base, and on a cheap rack that matters more than it looks. There is a large body of owner history to read before you buy — real accounts of how the cage holds up, how the assembly goes, and what people bolt it to — so you’re not gambling on a nameless import with no track record. CAP is widely stocked, the brand isn’t going to vanish, and if a part arrives damaged or missing you’re dealing with a known quantity and normal returns rather than a dead-end listing. For a first-time buyer, that researchability is a genuine part of the value.
It’s a useful counterweight to the thin-steel honesty above. The frame is basic, yes — but you can find out exactly what “basic” means in practice from thousands of people who already own it, and you can plan your anchoring and J-hook upgrades before the box even arrives. That’s a different and safer buying experience than the cheapest no-name cages on the market, which look similar on a spec sheet but come with none of the owner history to check them against.
Who should buy it — and who should step up
Buy the CAP ifyou want the cheapest complete four-post cage that isn’t a gimmick, you’re building a first home gym on a tight budget, you can bolt it to a concrete floor, and you’ll train at sensible loads rather than dumping near-maximal weight onto the safeties. With the pull-up bar and safety bars included and standard 2" plate fitment, it covers the core lifts for less money than almost anything else with four posts. It’s the value anchor of our best budget power rack field for exactly that reason: a real cage at a small price, with a huge owner base to research first.
Step up ifyou’re a strong lifter, you can’t anchor into concrete, or you simply want a rack that feels immovable out of the box. The next honest rung is a heavier cage with thicker steel, and the clearest way to understand that jump is our 11-gauge vs 14-gauge steel guide — moving to a 11-gauge cage buys a stiffer frame with a far higher ceiling and far less need to anchor. For a like-for-like budget alternative before you spend more, our VEVOR power cage review covers another popular cheap cage worth cross-shopping, and our best power rack roundup shows what the money buys once you climb past the entry tier. If you want to size up the whole decision by budget, our how much does a power rack costguide puts the CAP’s bracket in context against the rest of the market.
Setting it up right: anchoring, safeties and first sessions
Because so much of this rack’s real-world safety comes down to setup, it’s worth spelling out the routine. First, anchor it— lag-bolt the base into concrete before you load anything heavy, following our anchoring guide. Second, take a few minutes to set the safety barsat the right height for each lift: just below the bottom of your squat and below your chest for a bench, close enough to catch a failed rep but not so high they interrupt the lift. The safeties are the whole point of training alone in a cage, and they only work if they’re set correctly. Third, expect the assembly to take some patience — a budget cage rewards checking every bolt is snug and re-torquing them after the first week of use, when the frame has settled.
The mindset that gets the most out of this rack is to treat it as a solid, honest starting point rather than a lifetime cage. Buy it complete and cheap, anchor it properly, line the J-hooks to protect your bar, and train inside its moderate ceiling. Do that and it will serve a beginner-to-intermediate home gym for years while you build the habits and the strength. When you eventually outgrow it — a stronger lifter, a heavier program, or the itch for a rack you never have to think about — that’s the moment to move up to a thicker-steel cage, and the CAP will have paid for itself as the rack that got you started without overspending.
Sources
- CAP Power Rack with Pull-Up Bar — manufacturer product specification (full four-post cage with attachments, included pull-up bar and safety bars, 2" Olympic plate fitment, budget product line) as published on the retail listing.
- General power-rack spec principles (upright wall thickness and load ceiling, the case for bolting a light rack to the floor, J-hook liners and bar protection, cage vs stand design) as covered in our methodology and linked rack guides.